Get checkboxlist selected value using jQuery.

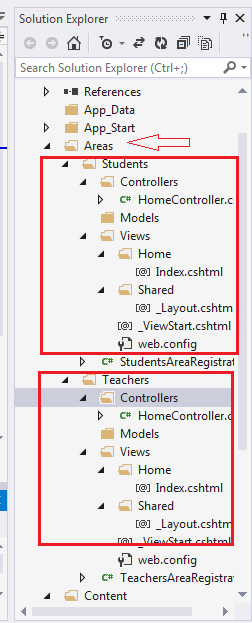
In this article, i am explain how to get checkbox selected value using jQuery.

First  take checkboxlist and button.


CheckboxList

now write jQuery in head section. 


jquery and javascript

here btnsubmit is ID of Submit button and chkList is ID of checkboclist.

Now run application. you will get selected value in alert message.


jquery and javascript

How to use wcf service in MVC 5.

In this article, I m explain How to use wcf service in MVC 5.

In previous post I explained How to Create WCF Service in Visual Studio 2013.

Now Continue with previous post.

Create new project, Right Click on Solution Explorer and add new project.

Select ASP>NET Web Application with .NET Framework 4.5.


ASP.NET WEB APPLICATION

Select Empty MVC Template.


ASP.NET MVC WEB APPLICATION

Your MVC project add in solution explorer.

Now first copy wcf service url.(Please first check previous post here)


ADD SERVICE REFERENCE


Now EmployeeService service references add in your WebApplication.

SERVICE REFERENCE IN ECF

Now right click on Employee service and Click on Configure Service Reference. 

CONFIGURE SERVICE REFERENCE

Now uncheck Reuse type in referenced assemblies and click ok.

CONFIGURE SERVICE REFERENCE


Add New Controller in MVC application.
CONTROLLER IN MVC

Now add following code in Index action.


ADD VIEW IN MVC
Right click on Action method and Add View.

Now Select Template List and Model class.


ADD VIEW IN MVC

Your View code look like this.


VIEW IN MVC


Now Run Application(Ctrl + F5).


WCF APPLICATION

Enjoy..!

How to Create WCF Service in Visual Studio 2013

In this article, I am explain how to use WCF service.

First Open Visual Studio 2013. Create New Project and select WCF Service Application and give name WCFdemo.


WCF SERVICE

Then Click ok. Now In Solution Explorer Right Click on WCFdemo project and Add New Item ADO.net entity data model.


ado.net data model

Add Database here and select Table.


Entity data model

Now Your Solution explorer look like this.


wcf

Now Add New item WCF Service.

wcf service

Select WCF Service and give name.

wcf service

Now EmployeeServices.svc and IEmployeeServices.cs file add in solution explorer.

Create wcf service

Now Open EmployeeServices.svc.cs file and write following code.

wcf service

Here Employee is my database table and m9codersEntities is entity name.

Now Open IEmployeeServices.cs and write method name of EmployeeServices.svc.cs file.

interface in wcf

Now Build Project. (shortcut- F6)

Now Run EmployeeServices.svc file.(ctrl+F5)  

Then Open WCF Client popup window.

wcf test client

And your Service Adding...

wcf test client

After Service added successfully then copy url and paste into your browser.

wcf test service

You can see your all Method here and now use in any project.

In Next article i will explain how to use wcf service in MVC.


Areas in MVC 5

In this article, I am explain how to use area in MVC.

When we create new MVC project then Model, View and  Controller folder create automatically.

This structure is comman for simple application. but when your application gets big and complex then single model, view and controller can get complicated.So we can maintained complex mvc application using area.Using areas, we can write more maintainable code for 
an application cleanly separated according to the modules.

SO First create new mvc empty project.

Then Right clcik on solution explorer and click on add and select area.


area in mvc


Give Name.


Area

now add second Employee area. In your solution explorer show your model, view and controller in diffrent student and employee area.


Area in mvc

Now add Home Controller and in Index action add Index View for both student and employee area.

Now Run Project.(ctrl+F5).

For Teacher area follwing url localhost/Teachers/Home/Index
Hear Teachers is area name, Home is controller and Index is Action name.


Area in mvc

For Teacher area follwing url localhost/Students/Home/Index
Hear Students is area name, Home is controller and Index is Action name.


Area in mvc


Download Webgrid data in a pdf file with MVC5

INTRODUCTION


In this article, I am explain How to Download Webgrid data in a pdf file.

In previous post I explained display data In webgrid and delete multiple rows by using checkboxes. Now i will explain how to download that data in a pdf file.

So first check previous post and add Action Link in list.cshtml for Create pdf.


webgrid in mvc

 Create PDF : @Html.ActionLink("Create PDF", "CreatePdf", "Home")


Go to Solution Explorer > Right Click on References > Manage NuGet Packages...> Search with itextsharp text > Install this 2 dll


NuGet Manager


iTextSharp


Now Add CreatePdf Action into Home Controller and also add following namespace.


using iTextSharp.text;

using iTextSharp.text.pdf;

using System.IO;

using System.Web.Helpers;


Now Add CreatePdf Action code .


public FileStreamResult CreatePdf()

        {

            List all = new List();          

            all = db.Employees.ToList();            

            WebGrid grid = new WebGrid(source: all, canPage: false, canSort: false);

            string gridHtml = grid.GetHtml(

                    columns: grid.Columns(

                           grid.Column("Id", "EmployeeId"),

                           grid.Column("Name", "Employee Name"),

                           grid.Column("City", "City"),

                           grid.Column("MobileNo", "Mobile No")

                        )

                    ).ToString();

            string exportData = String.Format("{0}{1}", "", gridHtml);

            var bytes = System.Text.Encoding.UTF8.GetBytes(exportData);

            using (var input = new MemoryStream(bytes))

            {

                var output = new MemoryStream();

                var document = new iTextSharp.text.Document(PageSize.A4, 50, 50, 50, 50);

                var writer = PdfWriter.GetInstance(document, output);

                writer.CloseStream = false;

                document.Open();

                var xmlWorker = iTextSharp.tool.xml.XMLWorkerHelper.GetInstance();

                xmlWorker.ParseXHtml(writer, document, input, System.Text.Encoding.UTF8);

                document.Close();

                output.Position = 0;

                return new FileStreamResult(output, "application/pdf");

            }

        }


RUN APPLICATION(CTTL + F5).


Create Pdf in mvc

Click on Create PDF. and get PDF.


pdf in mvc


Deploy ASP.NET Website on iis in our Local Machine

INTRODUCTION

In this article, I am explain How to Deploy ASP.NET Website on iis in our Local Machine.

First open your asp.net web application in visual studio.

Now in the top we have options Build  Click on that and under Build you will find Publish Website.


Publish website


Click on Publish Website. now open publish web pop up.

Select Publish method is File System

Target location for save your web application dll file.


Build project

After click on publish. 
Go to target folder. that location you will see your web application dll file.

target location

Now open iis manager.(type inetmgr in run command)

Right click on Default Application and Add Application.

iis manager

Enter Alis name , select Application pool and Physical path. 

add application

Now Double click on default document.


 And add start page of your web application.here my application start page is EstimationSlip.aspx

iis

Now Right click on your application and browse.

manage application

See your application without visual studio.

web application

Enjoy..!!